


3D-Coat Training
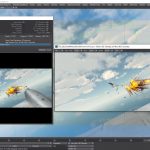
3D Coat 3.5 for Lightwave Users-Painting Color
In this final video on detailing the Suchomimus Dinosaur 3D Coat/Lightwave Instructor Adam Gibson shows how to paint color on the creature to add the final details that will all be merged into Lightwave's Layout for Rendering. Painting Colors on a 3D object is extremely fun and also an art form that can constantly be developed. Let Adam show you some beginning techniques to get you started on detailing your own 3D Models.
Table of Contents for Painting Color
Chapter 1- Intro
Chapter 2- Setting up Object and Using Layers
Chapter 3- Creating the Color Base Coat for the Mouth and Tongue
Chapter 4- Creating the Color Base Coat for the Body
Chapter 5- Creating the Color Base Coat for the Head
Chapter 6- Creating the Color Base Coat for the Spine Stripe
Chapter 7- Creating the Color Base Coat for the Finger Skin Rings
Chapter 8- Creating the Color Base Coat for the Toe Skin Rings
Chapter 9- Creating the Color Base Coat for the Feet
Chapter 10- Creating the Color Base Coat for the Finger Nails
Chapter 11- Creating the Color Base Coat for the Toe Nails
Chapter 12- Creating the Color Base Coat for the Inner Toe Claws
Chapter 13- Creating Tiger Style Stripes
Chapter 14- Creating Large Spots on the Body
Chapter 15- Creating Large Spots on the Head
Chapter 16- Blending the Scales on the Body
Chapter 17- Blending the Scales on the Tail
Chapter 18- Blending the Scales on the Neck and Head
Chapter 19- Hand and Arm Detailing
Chapter 20- Feet Detailing
Chapter 21- Inner Mouth Detailing
Chapter 22- Top of Head Detailing
Chapter 23- Side of Head and Jaw Detailing
Chapter 24- Exporting Lightwave Object, Color, Specular, Normal, and Displacement from 3DC
Chapter 25- Importing the Model into Lightwave's Layout with all the Detailed Image Maps
Chapter 26- Re-adding the Teeth and Eyes and applying Final Test Rendering in Lightwave
Level: Beginner
Running Time: 7 hrs 2 mins.
Screen Resolution: 1440 x 900 pixels
Video Format: Quicktime Video
In this video tutorial 3D Instructor Adam Gibson demonstrates how to detail a Suchomimus dinosaur using 3D Coat's Normal and Displacement Mapping tools. Learn how to take plain and low-detailed models and spice them up by adding muscle, bone, tendon, skin folds, bumps and scales to their surface.
Then the video finishes off by showing the secrets of taking the normal and displacement maps created in 3D Coat and exporting them out for use in Lightwave 3D.
Although setting up Normal Maps in Lightwave is relatively easy, Displacement Maps can be slightly challenging. Displacement Map set-up using the Node Editor is shown in great detail.
Table of Contents for Normal and Displacement Maps
Chapter 1- Intro
Chapter 2- Saving Out the Body Layer of the Mesh
Chapter 3- Import Body Layer into 3D Coat
Chapter 4- UV's and Displacements
Chapter 5- Detailing Leg Muscles
Chapter 6- Detailing the Feet
Chapter 7- Arm Detailing
Chapter 8- Detailing the Hands
Chapter 9- Creating Skin Rings
Chapter 10- Creating the Rib Cage
Chapter 11- Creating Spine Bones
Chapter 12- Detailing the Top and Side of the Head
Chapter 13- Throat and Lower Jaw Detailing
Chapter 14- Detailing the Tail
Chapter 15- Increasing the Texture Mesh Resolution
Chapter 16- Adding a New Displacement Layer
Chapter 17- Adding Scales Part 1
Chapter 18- Adding Scales Part 2
Chapter 19- Adding Scales Part 3
Chapter 20- Adding Scales Part 4
Chapter 21- Adding Scales Part 5
Chapter 22- Adding Scales Part 6
Chapter 23- Adding Scales Part 7
Chapter 24- Exporting Normal and Displacement Maps
Chapter 25- Normal and Displacement Maps Preview in Photoshop
Chapter 26- Normal Map Set Up in Lightwave 3D
Chapter 27- Displacement Map Set Up in Lightwave 3D
Chapter 28- How to Import and Export Nodes in Lightwave 3D
Chapter 29- Final
Running Time: 5 hrs. 48 mins.
Screen Resolution: 1440 x 900 pixels
Format: Quicktime Video
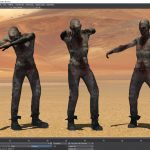
3D Coat 3.5 for Lightwave Users-Voxel Sculpting: Project Dragon
3D Coat 3.5 for Lightwave Users-Voxel Sculpting:Project Dragon-by Adam Gibson
In this videos series we show 3D students how to use 3D Coat and Lightwave 3D together as an easy and functional workflow and pipeline in your 3D projects. Although this video series uses Lightwave 3D as the final output for your 3D Coat work, the concepts and principles used here will work with all the most popular 3D programs like 3D Max, Maya, Softimage, Modo, Cinema 4D and many others.
Table of Contents for Voxel Sculpting
Chapter 1- Intro
Chapter 2- Converting Polygonal Mesh into Voxels Part One
Chapter 3- Converting Polygonal Mesh into Voxels Part Two
Chapter 4- Renaming Voxel Layers and Shaders
Chapter 5- Finger Detailing
Chapter 6- Hand Detailing
Chapter 7- Forearm and Bicep Detailing
Chapter 8- Creating Leg Muscles
Chapter 9- Knee and Shin Detailing
Chapter 10- Feet Detailing
Chapter 11- Creating Spine Bones and Rib Cage
Chapter 12- Elongating the Neck with the Pose Tool
Chapter 13- Transform Tool
Chapter 14- Neck Detailing
Chapter 15- Head Detailing
Chapter 16- Creating Finned-Styled Ears
Chapter 17- Creating the Head Crest and Horns
Chapter 18- Creating the Wings
Chapter 19- Wing Detailing
Chapter 20- Extending the Wing to the Body Layer
Chapter 21- Posing the Wing
Chapter 22- Adding Veins and Bumps to the Wings
Chapter 23- Mirroring the Wing
Chapter 24- Adding Scales to the Body Part One
Chapter 25- Adding Scales to the Body Part
Chapter 26- Adding Scales to the Body Part
Chapter 27- Adding Scales to the Body Part
Chapter 28- Adding Scales to the Body Part
Chapter 29- Adding Scales to the Body Part
Chapter 30- Adding Scales to the Body Part
Chapter 31- Adding Scales to the Body Part
Chapter 32- Final
Running Time: 7 hrs. 49 min.
High Quality (Screen-Res 1440 x 900 pixels) Quicktime Video
Level: Beginner
3D Coat 3.5 for Lightwave Users-UV Mapping
3D Coat 3.5 for Lightwave Users-UV Mapping-by Adam Gibson
In this videos series we show 3D students how to use 3D Coat and Lightwave 3D together as an easy and functional workflow and pipeline in your 3D projects. Although this video series uses Lightwave 3D as the final output for your 3D Coat work, the concepts and principles used here will work with all the most popular 3D programs like 3D Max, Maya, Softimage, Modo, Cinema 4D and many others.
In this Video Tutorial Adam Gibson shows a full blown project based session on how to perfectly UV Map a Suchomimus Dinosaur. The techniques and tools are shown to create UV maps with no overlapping UV's. Good UV mapping skills are needed to create great texture maps for your characters and 3D object. This video holds the information you need to start making great UV maps for your own projects.
Table of Contents for UV Mapping
Chapter 1- Intro
Chapter 2- Importing Meshes for UV Mapping in 3D Coat -Part One
Chapter 3- Renaming UV Maps
Chapter 4- Importing Meshes for UV Mapping in 3D Coat -Part Two
Chapter 5- Importing Meshes for UV Mapping in 3D Coat -Part Three
Chapter 6- How to Import Multiple UV Maps into 3D Coat
Chapter 7- Adding UV Seams-Part One
Chapter 8- Adding UV Seams-Part Two
Chapter 9- Adding UV Seams-Part Three
Chapter 10- Adding UV Seams-Part Four
Chapter 11- Adding UV Seams-Part Five
Chapter 12- Unwrap Test
Chapter 13- UV Seam Adjustment
Chapter 14- 3D Coat Crashes
Chapter 15- Work Around Exporting Method of Layered UV Mapped Object to Lightwave 3D
Level: Beginner
Running Time: 1 hr. 56 mins.
High Quality (Screen-Res 1440 x 900 pixels) Quicktime Video

3D Coat 3.5 for Lightwave Users-Retopology II
3D Coat 3.5 for Lightwave Users-Retopology II-Project Suchomimus-by Adam Gibson
In this videos series we show 3D students how to use 3D Coat and Lightwave 3D together as an easy and functional workflow and pipeline in your 3D projects. Although this video series uses Lightwave 3D as the final output for your 3D Coat work, the concepts and principles used here will work with all the most popular 3D programs like 3D Max, Maya, Softimage, Modo, Cinema 4D and many others.
In this second retopology volume of 3D Coat 3.5 for Lightwave Users Adam Gibson demonstrates the full retopology of a Suchomimus Dinosaur model to create a mesh with better polygonal edge flow. Retopology of your models is designed to make models easier to apply UV Maps, texturing, and animating. Models with bad topology can create a great deal of problems in a production pipeline. This video combines the strength of both programs to create a clean streamlined character model with all the steps revealed.
Table of Contents for Retopology II
Chapter 1- Intro
Chapter 2- Importing Lightwave Objects Into 3D Coat
Chapter 3- Claws Part-One
Chapter 4- Claws Part-Two
Chapter 5- Claws Part-Three
Chapter 6- Hand and Arm Geometry
Chapter 7- Inner Toe Geometry Part-One
Chapter 8- Inner Toe Geometry Part-Two
Chapter 9- Feet Part-One
Chapter 10- Feet Part-Two
Chapter 11- Feet Part-Three
Chapter 12- Feet Part-Four
Chapter 13- Feet Part-Five
Chapter 14- Feet Part-Six
Chapter 15- Feet Part-Seven
Chapter 16- Feet Part-Eight
Chapter 17- Feet Part-Nine
Chapter 18- What to do if 3D Coat Crashes
Chapter 19- Leg Editing
Chapter 20- Creating Eye Geometry
Chapter 21- Creating the Eye Socket
Chapter 22- Creating Nostrils
Chapter 23- Head Geometry Part-One
Chapter 24- Head Geometry Part-Two
Chapter 25- Head Geometry Part-Three
Chapter 26- Head Geometry Part-Four
Chapter 27- Head Geometry Part-Five
Chapter 28- Connecting Body Geometry Together Part-One
Chapter 29- Connecting Body Geometry Together Part-Two
Chapter 30- Making the Tail
Chapter 31- Connecting the Head to the Body Part-One
Chapter 32- Connecting the Head to the Body Part-Two
Chapter 33- Final Tweaks in 3D Coat
Chapter 34- Importing the Retopologized Mesh into Lightwave
Chapter 35- Editing the Tail
Chapter 36- Setting Up Symmetry in Lightwave
Chapter 37- Matching the Retopo Mesh with a Background Mesh
Chapter 38- Inner Mouth Creation
Chapter 39- Building the Throat
Chapter 40- Building the Tongue
Chapter 41- Adding the Teeth and Eye Balls to the Retopo Mesh
Running Time: 8 hrs 34 mins.
High Quality (Screen-Res 1440 x 900 pixels) Quicktime Video

3D Coat 3.5 for Lightwave Users-Auto-Retopology-by Adam Gibson
In this videos series we show 3D students how to use 3D Coat and Lightwave 3D together as an easy and functional workflow and pipeline in your 3D projects. Although this video series uses Lightwave 3D as the final output for your 3D Coat work, the concepts and principles used here will work with all the most popular 3D programs like 3D Max, Maya, Softimage, Modo, Cinema 4D and many others.
In this volume on the new Autoretopology tool in 3D Coat 3.5 basic and advanced uses of the Auto-Retopology tool are demonstrated in great depth. Workflow application and pipeline use are shown with regards to how to combine Lightwave's Modeler tools with 3D Coat's standard retopology tool set to correct Auto-Retopology glitches, gotchas, errors and limitations. With the methods included in this video you will learn how create clean retopologized meshes for use in Lightwave or other 3D packages.
The video starts off with how to use the Auto-Retopology tool and then finishes with a full hands on project on a rhinoceros model/mesh that needs to be retopologized and exported to Lightwave 3D.
Table of Contents for Auto-Retopology
Chapter 1- Intro
Chapter 2- Retopology Basics: Voxels Part One
Chapter 3- Retopology Basics: Voxels Part Two
Chapter 4- Retopology Basics: Voxels Part Three
Chapter 5- Retopology Basics: Voxels Part Four
Chapter 6- Retopology: Creature Model Part One
Chapter 7- Retopology: Creature Model Part Two
Chapter 8- Density Modulator
Chapter 9- Strokes and Edge Flow
Chapter 10- Deleting NGons and Triangles
Chapter 11- Advanced Mesh Retopo: Part One
Chapter 12- Advanced Mesh Retopo: Part Two
Chapter 13- Advanced Mesh Retopo: Part Three
Chapter 14- Advanced Mesh Retopo: Part Four
Chapter 15- Human Head Retopo: Part One
Chapter 16- Human Head Retopo: Part Two
Chapter 17- Rhino Retopo Project: Part One
Chapter 18- Rhino Retopo Project: Part Two
Chapter 19- Rhino Retopo Project: Part Three
Chapter 20- Rhino Retopo Project: Part Four
Chapter 21- Rhino Retopo Project: Part Five
Chapter 22- Rhino Retopo Project: Part Six
Chapter 23- Rhino Retopo Project: Part Seven
Chapter 24- Rhino Retopo Project: Part Eight
Chapter 25- Rhino Retopo Project: Part Nine
Chapter 26- Rhino Retopo Project: Part Ten
Chapter 27- Rhino Retopo Project: Part Eleven
Chapter 28- Rhino Retopo Project: Part Twelve
Chapter 29- Rhino Retopo Project: Part Thirteen
Running Time: 6 hrs. 15 mins.
High Quality (Screen-Res 1440 x 900 pixels) Quicktime Video