Liberty3D.com is proud to present the complete TA-Tools set from Timothy Albee.
This legendary tool package has been used on several productions around the world.
As an LScript set of tools these will run on LightWave3D up to version 11.6 in Modeler
and Layout. They include the following tools.
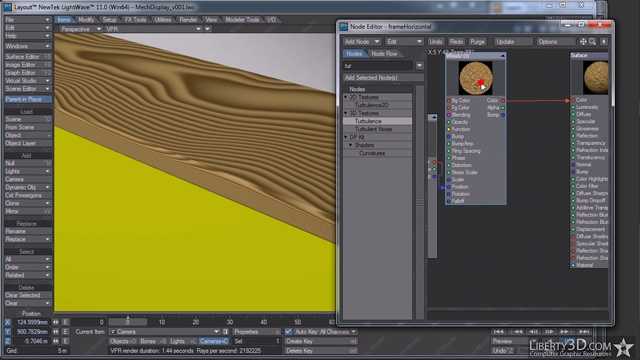
In this tutorial for LightWave 3D, Dana W. Burman shows how to build and animate a mechanical display with irregularly shaped panels using Denis Pontonnier's DP Kit Part Move plugin. Along the way he covers some simple modeling techniques, surfacing with the node editor, and using Part Move in animation and texturing. He also demonstrates a couple of other mechanical display scenes which are also included in the tutorial files.
Most of this tutorial should be able to be done in LightWave 9.6 and up with the exception of a few of the modeling tools used which were added in 11.5, and the .mdd baking tools used. We did not check the LightWave 9 or 10 versions of DP Kit to see if they have the functionality used in this tutorial.
Digital Download: 648MB
Total Running Time is 2 hours 11 minutes
Kelly "Kat" Myers is back with the first in the Advanced Concepts and Projects Series for Turbulence FD by Jawset.com
In this video, Kat shows you step by step the process in creating a fire ball effect similar to a ground burst or that of a gas bomb explosion. This is an extension of the concepts shown in the Introduction to Turbulence FD for LightWave3D video available here from Liberty3d.com.
With a run time of 150 minutes this video includes all the scene files you need to follow along and experiment with your own settings while learning more about the shading and emission techniques used.
Each of the Advanced Concepts and Projects videos in this series are designed to get you the information and scene examples you need to quickly produce an effect covered in a project. Pick and choose which ones you need when you need them.
Price: $14.95
LightWave 11.5 Modeler Tools- Volume #7 [AG]
In this Seventh Volume of 12 Volumes Lightwave Instructor Adam Gibson introduces the 3D student to Lightwave's Powerful Modeler. A great series for beginner 3D students. Table of Contents for Modeler Volume #7: Chapter 1- Intro, Chapter 2- Selection Modes, Chapter 3- Connected Tool, Chapter 4- Invert Selection Tool, Chapter 5- Expand and Contract Tool, Chapter 6- Select Loop Tool, Chapter 7- Select Next and Previous Loop, Chapter 8- Select Outline and Sel Switch, Chapter 9- Select Points, Edges, Polygons, Chapter 10- Change Selection Mode and Drop Selection, Chapter 11- Sel Outline Points and Sel Outline Edges, Chapter 12- Edges: Loop Expand and Loop Contract, Chapter 13- Sel Outline Edges and Sel Edge Border, Chapter 14- Sel Open Edges, Chapter 15- Pick Surface Tool, Chapter 16- Select Drop-down List, Chapter 17- Final. Running Time: 1 hrs. 37 mins., Resolution: 1920 x 1080 pixels, Video Format: MP4 Video (.mp4), Level: Beginner
Price: $19.00
LightWave 11.5 Modeler Tools -Volume #6 [AG]
In this Sixth Volume of 12 Volumes Lightwave Instructor Adam Gibson introduces the 3D student to Lightwave's Powerful Modeler. A great series for beginner 3D students. Table of Contents for Modeler Volume #6: Chapter 1- Intro, Chapter 2- Merge Points Tool, Chapter 3- Weld Tool, Chapter 4- Set Value Tool, Chapter 5- Extrude Tool, Chapter 6- Taper Tool, Chapter 7- Magnet Tool, Chapter 8- Unweld Tool, Chapter 9- Bridge Tool (Part One), Chapter 10- Bridge Tool (Part Two), Chapter 11- Connect Tool, Chapter 12- Delete Tool, Chapter 13- Final, Running Time: 2 hrs. 7mins., Resolution: 1920 x 1080 pixels, Video Format: MP4 Video (.mp4), Level: Beginner
Price: $19.00
LightWave 11.5 Modeler Tools -Volume #5 [AG]
In this Fifth Volume of 12 Volumes Lightwave Instructor Adam Gibson introduces the 3D student to Lightwave's Powerful Modeler. A great series for beginner 3D students. Table of Contents for Modeler Volume #5: Chapter 1- Intro, Chapter 2- Rounder Tool, Chapter 3- Bevel Tool, Chapter 4- Extender Plus Tool, Chapter 5- Knife Tool, Chapter 6- Straighten Tool, Chapter 7- Edit Edges Tool, Chapter 8- Spin Edge Tool, Chapter 9- Border Slice Quad Tool, Chapter 10- Border Slice Tool, Chapter 11- Add Edges Tool, Chapter 12- Bend Tool, Chapter 13- Final. Running Time: 2 hrs. 20 mins., Resolution: 1920 x 1080 pixels, Video Format: MP4 Video (.mp4), Level: Beginner
Price: $19.00
Lightwave 11.5 UV Mapping Essentials
In this video tutorial Lightwave Instructor Adam Gibson introduces the 3D student the basics of UV Mapping in Lightwave 11.5. Table of Contents for UV Mapping Essentials: Chapter 1- Intro, Chapter 2- UV Interface Tour, Chapter 3- UV Mapping Primitives, Chapter 4- Spherical UV Mapping Options, Chapter 5- UV Mapping Text Objects, Chapter 6- UV Mapping a Cigarette Box, Chapter 7- Create Artwork for UV Map in Adobe Photoshop, Chapter 8- Apply Artwork in Lightwave for the UV Map, Chapter 9- How to Copy and Paste UVs and Final, Running Time: 3 hrs. 3 mins., Resolution: 1920 x 1080 pixels, Video Format: MP4 Video (.mp4), Level: Beginner
Kelly "Kat" Myers is back again with "Introduction to TurbulenceFD for LightWave3D"!
Intended for first time users of TurbulenceFD as well as a reference for more experienced users of LightWave3D, this video tutorial will help in deciphering the various settings and meanings in the plug-in. Exploring the fundamental concepts behind computational fluid dynamics and TFD itself, Kat also shows you some of the "gotchas" that can easily frustrate users from tips on how to avoid certain types of crashes, artifacts in your TFD sims and tips on optimization.
This video has 24 main parts and 2 smaller sections introducing the video as well as plug-in installation covering all of the basic functions of the plug-in while addressing techniques and concepts behind fuel masking, normal force and pressure, surface texture emission and more.
The first in a two part series, "Introduction to TurbulenceFD for LightWave3D" is an essential video in getting you up and running fast. The second video "TurbulenceFD For LightWave3D: Projects" will be released shortly at a discounted price.
Get your copy today and start setting things ablaze with TFD for LightWave!
Video Resolution: 1920×1080
Approximate Duration: 325 min.
Price: $34.95
LightWave 11.5 Modeler Tools -Volume #4 [AG]
In this Fourth Volume of 12 Volumes Lightwave Instructor Adam Gibson introduces the 3D student to Lightwave's Powerful Modeler. A great series for beginner 3D students. Table of Contents for Modeler Volume #4: Chapter 1- Intro, Chapter 2- Add Center Point Tool, Chapter 3- Text Tool, Chapter 4- Rotate Tool, Chapter 5- Stretch Tool, Chapter 6- Size Tool, Chapter 7- Transform Tool (Part One), Chapter 8- Transform Tool (Part Two), Chapter 9- Points Tool, Chapter 10- Make Polygon Tool, Chapter 11- Pen Tool, Chapter 12- Sketch Tool, Chapter 13- Final. Running Time: 2 hrs. 2 mins., Resolution: 1920 x 1080 pixels, Video Format: MP4 Video (.mp4), Level: Beginner
Price: $19.00
Lightwave 11.5 UV Mapping a Creature
In this video tutorial Lightwave Instructor Adam Gibson will show the 3D student how to UV Unwrap a Suchomimus dinosaur for the eventual purpose of texturing and detailing. Topics Covered: Retopology for Better UV Maps, Edge Selection for Creating UV Islands, ABF UV Unwrap Tool, Renaming UV's, UV Editing Tools, UV Interpolation Modes, Tweaking and UV Correction Techniques. A great video to quickly understand how to UV map your characters. Table of Contents for UV Mapping Essentials: Chapter 1- Intro, Chapter 2- Retopology for UV Mapping, Chapter 3- Creating UV Seams (Part One), Chapter 4- Creating UV Seams (Part Two), Chapter 5- Creating UV Seams (Part Three), Chapter 6- Creating UV Seams (Part Four), Chapter 7- ABF (Angle Based Flattening) UV Unwrap, Chapter 8- How to Rename a UV Map, Chapter 9- Organize UV Islands, Chapter 10- Final Edit of the UV Map. Running Time: 3 hrs. 7 mins., Resolution: 1920 x 1080 pixels, Video Format: MP4 Video (.mp4), Level: Beginner.
Price: $19.00
LightWave 11.5 Modeler Tools -Volume #3 [AG]
In this Third Volume of 12 Volumes Lightwave Instructor Adam Gibson introduces the 3D student to Lightwave's Powerful Modeler. A great series for beginner 3D students. Table of Contents for Modeler Volume #3: Chapter 1- Intro, Chapter 2- Slice Tool, Chapter 3- Place Mesh Tool, Chapter 4- Chamfer Tool (Part One), Chapter 5- Chamfer Tool (Part Two), Chapter 6- Thicken Tool (Part One), Chapter 7- Thicken Tool (Part Two), Chapter 8- Heat Shrink Tool, Chapter 9- Final, Running Time: 1 hrs. 48 mins., Resolution: 1920 x 1080 pixels, Video Format: MP4 Video (.mp4), Level: Beginner
If you are looking to get up to get started quickly using the new Lightwave 11.5 Genoma Rigging Tools this is the training series for you. This video bundle includes Genoma Volumes #1,2,3, and 4. Level: Beginner. Video Format: MP4 ).mp4 at 1920x1080 pixels. Running Time: 12 hrs 13 mins.
Price: $65.00
Lightwave 11.5 Genoma Rigging- Volume #4
In this video tutorial Lightwave Instructor Adam Gibson demonstrates how to rig a quadruped dog character using Lightwave 11.5's new powerful Genoma Rigging tools. Topics Covered: Importing Genoma Presets in Modeler, How to Combine Genoma Presets, Rig Editing, Test Deformations, and Weight Mapping. A Great tutorial to get you up and started rigging Quadruped (4 legged) characters while also getting a first hand look at how to deal with some of the gotchas and pitfalls of rigging a character using Genoma. Table of Contents for Genoma Volume #4: Chapter 1- Intro, Chapter 2- Import Model and Insert Quadruped Rig Preset, Chapter 3- Adjust Leg and Spine Bones, Chapter 4- Add Head Preset, Chapter 5- Add Tail Preset, Chapter 6- Adjust Neck Bone, Chapter 7- Welding the Tail and Head to the Body, Chapter 8- Test Deformations in Layout, Chapter 9- Weight Maps (Part One), Chapter 10- Weight Maps (Part Two), Chapter 11- Assign Weight Maps to Genoma Skelegons, Chapter 12- More Deformation Tests, Chapter 13- Chest Deformation Issues, Chapter 14- Review and Final, Running Time: 3 hrs. 44 mins., Resolution: 1920 x 1080 pixels, Video Format: MP4 Video (.mp4), Level: Beginner
Price: $19.00
Lightwave 11.5 Genoma Rigging- Volume #3
In this video tutorial Lightwave Instructor Adam Gibson demonstrates how to rig a female human character using Lightwave 11.5's new powerful Genoma Rigging tools. Topics Covered: Genoma Bi-Ped Preset, Weight-Maps, IK (Inverse Kinematics), Editing Genoma Bi-Ped Preset to Conform to the Female Model, Arm and Leg Pre-Bending for IK, Deformation Tests, and Posing. A Great tutorial to get you up and started rigging bi-ped characters while also getting a first hand look at how to deal with some of the gotchas and pitfalls of rigging a character using Genoma. Table of Contents for Genoma Volume #3: Chapter 1- Intro, Chapter 2- Importing Genoma Bi-Ped Rig and Pre-Bend Limbs, Chapter 3- Adjusting the Genoma Skelegons in the Head, Chapter 4- Adjusting the Neck, Spine, Hips and Legs, Chapter 5- Adjusting Arm Skelegons and Test Deformations, Chapter 6- Adjusting the Foot Skelegons, Chapter 7- Adjusting the Hand and Finger Skelegons, Chapter 8- Creating the Lower Jaw Weight Map, Chapter 9- Assigning Weight Maps to the Genoma Skelegons, Chapter 10- Test Deformations and Final. Running Time: 3 hrs. 51 mins., Resolution: 1920 x 1080 pixels, Video Format: MP4 Video (.mp4), Level: Beginner
Price: $19.00
Lightwave 11.5 Genoma Volume #2
In this second volume on Genoma Rigging, Lightwave Instructor Adam Gibson introduces Lightwave 11.5's newest set of rigging tools. Topics covered: Genoma Muscles, Genoma Tendons, How to Set-Up the Genoma Head Rig, Adding Weight-Maps, Correcting Deformation Problems. A must have video on how to get started using this powerful new rigging tool!! Table of Contents for Genoma Volume #2: Chapter 1- Intro, Chapter 2- Genoma Muscles (Introduction), Chapter 3- Genoma Tendons (Introduction), Chapter 4- Head Rig Set-Up (Part One)- Weight Maps, Chapter 5- Head Rig Set-Up (Part Two)- Genoma Skelegon Editing, Chapter 6- Head Rig Set-Up (Part Three), Chapter 7- Head Rig Set-Up (Part Four), Chapter 8- Final. Running Time: 2 hrs. 5 mins., Resolution: 1920 x 1080 pixels, Video Format: MP4 Video (.mp4), Level: Beginner
Price: $19.00
Lightwave 11.5 Genoma Volume #1
In this first volume on Genoma Rigging, Lightwave Instructor Adam Gibson introduces Lightwave 11.5's newest set of rigging tools. Topics covered: Using the Genoma Presets Panel, Full-Rigs, Sub-Rigs, Genoma Skelegons, Bones, Types of Genoma Connectors, Bone Influence, Welding Rigs Parts together, Importing Genoma Rigs into Layout, Exporting Genoma Rigs out of Modeler, Genoma Tips, and dealing with Errors/Gotchas. A must have video on how to get started using this powerful new rigging tool!! Table of Contents for Genoma Volume #1: Chapter 1- Intro, Chapter 2- Genoma Menu Orientation, Chapter 3- Genoma Bi-Ped Rig Demo/Introduction, Chapter 4- Genoma Presets Panel, Chapter 5- How to Export a Genoma Rig into Layout, Chapter 6- Basics of Connectors, Chapter 7- Passive and Active Connectors, Chapter 8- Connectors and Points/Vertices, Chapter 9- How to Create a Genoma Preset, Chapter 10- Final. Running Time: 2 hrs. 33 mins., Resolution: 1920 x 1080 pixels, Video Format: MP4 Video (.mp4), Level: Beginner
Price: $19.00
LightWave 11.5 Modeler Tools -Volume #2 [AG]
In this First Volume of 12 Volumes Lightwave Instructor Adam Gibson introduces the 3D student to Lightwave's Powerful Modeler. A great series for beginner 3D students. Table of Contents for Modeler Volume #2: Chapter 1- Intro, Chapter 2- Box Tool (Part One), Chapter 3- Box Tool (Part Two), Chapter 4- Ball Tool, Chapter 5- Cone Tool, Chapter 6- Disc Tool, Chapter 7- Drag Tool, Chapter 8- Snap Drag Tool, Chapter 9- Tweak Tool, Chapter 10- Axis Rotate Tool (Part One), Chapter 11- Axis Rotate Tool (Part Two), Chapter 12- Axis Scale Tool, Chapter 13- Final, Running Time: 2 hrs. 46 mins., Resolution: 1920 x 1080 pixels, Video Format: MP4 Video (.mp4), Level: Beginner
Price: $19.00
LightWave 11.5 Modeler Tools- Volume #1 [AG]
In this First Volume of 12 Volumes Lightwave Instructor Adam Gibson introduces the 3D student to Lightwave's Powerful Modeler. A great series for beginner 3D students. Table of Contents for Modeler Volume #1: Chapter 1- Intro, Chapter 2- Modeler Overview, Chapter 3- Polygon Types and Theory, Chapter 4- Unit Primitives, Chapter 5- The Move Tool in Detail, Chapter 6- Axis Translate Tool (Part One), Chapter 7- Axis Translate Tool (Part Two), Chapter 8- Axis Translate Tool (Part Three), Chapter 9- Final, Running Time: 3 hrs. 19 mins., Resolution: 1920 x 1080 pixels, Video Format: MP4 Video (.mp4), Level: Beginner
Price: $19.00
Lightwave 11.5- UV Mapping a Human
In this video tutorial Lightwave Instructor Adam Gibson demonstrates how to UV Unwrap a Human using the new powerful ABF Unwrap tool in Lightwave 11.5. Problem Solving and Work Flow is shown in great detail in order to educate you on how to get the best possible UV Maps for your 3D models. Without clean UV Maps it is very difficult to have glitch-free textures. This tutorial will give you the knowledge on how to pre-plan your UV unwraps and how to fix UV unwrapping errors. *Bonus: Includes all Content Files and a free Female Human Model. Running Time: 4 hrs. 21 mins., Resolution: 1920 x 1080 pixels, Video Format: MP4 Video (.mp4), Level: Beginner
Space Toon: Volume One is a project-based tutorial that takes you from scratch to a retro-cartoon inspired shot using LightWave 11.5. This covers creating the environment, modeling the planet, wreckage and space fighters. Particular attention is given to the Node Editor for object edges - a new feature in LightWave 11.5.
GoZ for Lightwave 11 and ZBrush Users- Volume #3- Endomorphs
GoZ is a new and powerful addition to Lightwave 11. In this third volume on GoZ Instructor Adam Gibson demonstrates how to create Endomorphs in ZBrush for use in Lightwave 3D. Learn the theory, the possibilities, and the Gotchas that can arise combined with the understanding of how to overcome them.
Being able to take advantage of powerful Zbrush sculpting tools for animation purposes will open new doors for your creations. Learn to how to combine Endomorphs created in both ZBrush and Lightwave for maximum control over your objects. A Great Video for those who wish increase their knowledge on how to integrate Lightwave and Zbrush together for animation purposes!! Running Time: 2 hrs. 5 mins., High Quality (Screen-Res 1920 x 1080 pixels) MP4 Video (.mp4), Level: Beginner to Intermediate
Price: $19.00
Lightwave 11- Endomorph Essentials
In this training video Lightwave 3D Instructor Adam Gibson demonstrates how to quickly get started using Endomorphs for animation production. Tips and Tricks are shown on how to avoid mesh distortions when using Endomorphs on Sub-D models. Multiple examples using Endomorphs are shown in detail to provide the 3D student a strong foundation of how they could use and create their own imaginative uses for Endomorphs. A great training video for beginner Lightwave users!! Running Time: 3 hrs. 44 mins., High Quality (Screen-Res 1920 x 1080 pixels) MP4 Video, Level: Beginner & Up
Price: $19.00
Lightwave 11 -Rigging a Tiger
In this training video Lightwave 3D Instructor Adam Gibson demonstrates how to rig a tiger character for animation using Layout's powerful Bone Tools and IK (Inverse Kinematics) System. Tips and Tricks on how to clean up your rig to avoid typical problems like Gimble Lock and glitches during animating. Other topics covered include: Foot Control Goals for Position and Foot Pivoting, Knee/Elbow Control, the use of "Hold Bones" and "Weight Maps". A great video for beginner level Lightwave users to get started rigging Quadruped "Toe Walker" style animals like tigers, lions, cats, dogs and more!!
*Bonus: Includes Tiger model and all Scene Files so you can follow along with course!! Running Time: 8 hrs 52 mins., High Quality (Screen-Res 1920 x 1080 pixels) MP4 Video, Level: Beginner & Up
Price: $19.00
GoZ for Lightwave 11 and ZBrush Users-Volume #2-UV Maps
GoZ is a new and powerful addition to Lightwave 11. In this second volume on GoZ an in depth study of the possibilities, strengths and limitations of UV Mapping in both software applications are shown. Tips and Tricks are shown how to deal with typical problems gotchas that can arise when integrating Lightwave with ZBrush. Learn how to create UV Maps for your 3D models using Zbrush's powerful "UV Master" Plugin.
Running Time: 3 hrs. 52 mins.
High Quality (Screen-Res 1680 x 1050 pixels) MP4 Video (.mp4)
Level: Beginner to Intermediate
Price: $19.00
Lightwave 11-Animating a Human-Vol.#1-How to Make Your Character Walk [AG]
In this training course for beginner Lightwave students 3D Instructor Adam Gibson shows the essential basics of how to animate a character walking. Keyframing concepts and problem solving are covered in an easy to understand video chapters.
*All Model and Scene Files are included with the course so that you can follow along.
High Quality (Screen-Res 1440 x 900 pixels) Quicktime Video
Level: Beginner
Running Time: 3 hrs. 56 mins.
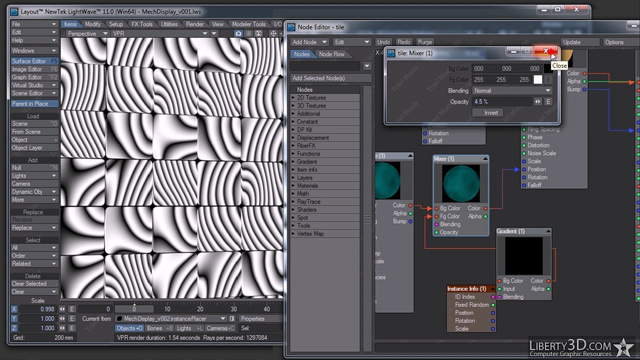
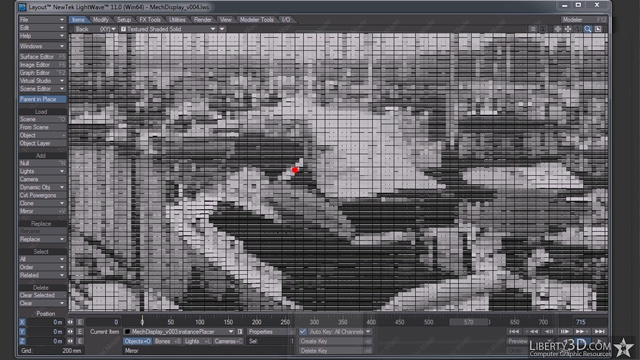
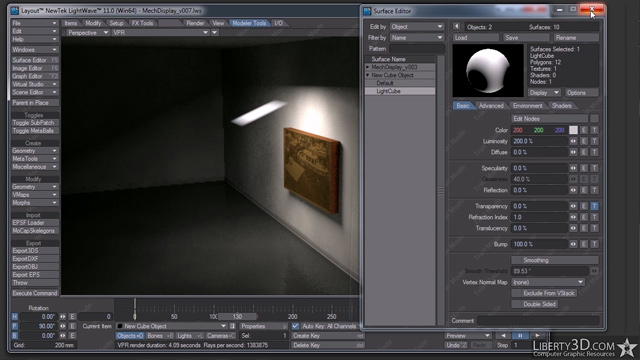
Mechanical displays use moving parts to display an image. In the case of this project, the image is made by the tilting of little wooden tiles. This set of videos covers building this project from the ground up including modeling, texturing (both basic and Node-Based), instancing, and using an image sequence to animate the instances. This is not an in-depth study of any one area/tool in LightWave and little time is spent covering features and options that are not actually used in this project.
TRT: 4 hours 20 minutes
UPDATE: This product now includes a free bonus tutorial: Mechanical Displays: Morph, which shows how to set up and animate a morph-based mechanical display that will work LightWave 9 and up.
Liberty3D UberCam 2.6 for LightWave3D 9.3.1 - LightWave 2015 (and beyond!)
More Awesome Cameras and tools for LightWave3D that you can use in production right away. We have updated our VR Cameras in this release to provide for "back seam" free rendering as well as a completely re-written algorithm for our VR Stereo Camera giving you the best stereoscopic rendering for VR video out there.
You get the following Cameras:
Liberty3D VR Stereoscopic Camera (New in 2.1) The ultimate solution for creating stereoscopic Spherical 360 Degree VR Video!
Liberty3D VR Camera (New in 2.0!) Make Spherical 360 degree videos on youtube.com, Facebook and more!
Liberty3D Surface Baking Camera (New in 2.0!)
Liberty3D Spherical Camera (Updated for 2.0!)
Liberty3D Radial Shift Camera (Updated for 2.0!)
Liberty3D OverScan Camera (Updated for 2.0!)
Liberty3D SuperPano Camera (Updated for 2.0!)
Liberty3D Dual-Cam Camera (Updated for 2.0!)
Liberty3d 4-Up Camera (Updated for 2.0!)
Liberty3D 12-Up Camera (Updated for 2.0!)
Liberty3D Perspective Camera (DOF) (Motion Blur) (Updated for 2.0!)
Liberty3D Perspective Camera (No DoF) (Motion Blur) (Updated for 2.0!)
Liberty3D Perspective Camera (No DoF) (No Motion Blur) (Updated for 2.0!)
Liberty3D Panoramic Camera (Updated for 2.0!)
Liberty3D Cylinder Camera (Updated for 2.0!)
Liberty3D Skybox Camera (Updated for 2.0!)
Liberty3D FishEye Camera (Updated for 2.0!)
You get the following Tools:
VRHeadset Manager (For use with both Oculus Rift DK1.1 and DK2 Virtual Reality Headsets)
Virtual Studio Tools VR Headset Device Node (For connecting your camera in lightWave to the Oculus Rift via virtual Studio Tools)
UberRift Viewer (A brand new floating viewer window that works with the Oculus Rift in stereoscopic, properly applying the barrel lens distortion effect to your layout camera viewport)
L3D Oculus Rift Barrel Distortion Image Filter (For use with our Stereoscopic camera so you can render out images using LightWave's renderer for viewing on the Oculus Rift)
This release of UberCam 2.6 is jammed packed with features and comes with an awesome 60+ page manual covering everything you need to know about how to set up your Oculus Rift and use it with LightWave3D plus handy tips on VR content creation using our new VR and VR Stereoscopic Cameras
MacOS 32bit/64bit (Universal Binary), Win64bit and Win32bit versions are shipped in this plug-in along with our new manual.
Please note that at this time the UberRift viewer works on Windows PC platforms (32bit and 64bit) only and requires at least LightWave3D 11.6.3.
Most camera plug-ins are backward compatible to LightWave 9.3.1.
LightWave 2017 is supported.
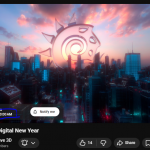
Continuing on with the concepts and techniques from Advanced Space Scene Creation Vol. 1, Kelly "Kat" Myers takes you to another level showing you how to mix LightWave volumetrics and objects to create even more fantastical space scenes.
This video includes the assets for you to immediately open up, drop in your own space ship and go. You can follow along with the tutorial video (which is over 2 hours in length) and make your own scene easily, building on these techniques which are widely used in space scenes as shown on TV and in Film.
This video tutorial compliments Advanced Space Scene Creation Vol. 1 and makes a great addition to that volume, but can be used and understood without having it in your collection. At this low price of just $17.99USD, Advanced Space Scene Creation Vol. 2 is a great deal. More videos in this series are planned, advancing each time in complexity and techniques and will be made available exclusively through Liberty3d.com


![Mechanical Displays 2: Part Move [dwb]](https://www.liberty3d.com/wp-content/uploads/2013/09/MechanicalDisplays2_square.jpg)
![TFD Advanced Concepts And Projects - FireBall [KAT]](https://www.liberty3d.com/wp-content/uploads/2013/09/PFX_SingleStateExplosionTwo_R05.jpg)
![LightWave 11.5 Modeler Tools- Volume #7 [AG]](http://www.learn3dsoftware.com/LW_11_5_Modeler_Product_Box_Vol_7_400pix.jpg)
![LightWave 11.5 Modeler Tools -Volume #6 [AG]](http://www.learn3dsoftware.com/LW_11_5_Modeler_Product_Box_Vol_6_400pix.jpg)
![LightWave 11.5 Modeler Tools -Volume #5 [AG]](http://www.learn3dsoftware.com/LW_11_5_Modeler_Product_Box_Vol_5_400pix.jpg)

![Intro to TurbulenceFD For LightWave3D [KAT]](https://www.liberty3d.com/wp-content/uploads/2013/05/TFDPromoImage1.jpg)
![LightWave 11.5 Modeler Tools -Volume #4 [AG]](http://www.learn3dsoftware.com/LW_11_5_Modeler_Product_Box_Vol_4_400pix.jpg)
![LightWave 11.5 Modeler Tools -Volume #3 [AG]](http://www.learn3dsoftware.com/LW_11_5_Modeler_Product_Box_Vol_3_400pix.jpg)

![LightWave 11.5 Modeler Tools -Volume #2 [AG]](http://www.learn3dsoftware.com/LW_11_5_Modeler_Product_Box_Vol_2_400pix.jpg)
![LightWave 11.5 Modeler Tools- Volume #1 [AG]](http://www.learn3dsoftware.com/LW_11_5_Modeler_Vol_1_400pix.jpg)

![Space Toon: Volume One [dwb]](https://www.liberty3d.com/wp-content/uploads/2013/02/Space-Toon-Square.jpg)


![Lightwave 11-Animating a Human-Vol.#1-How to Make Your Character Walk [AG]](http://www.learn3dsoftware.com/LW_Animating_A_Human_Vol_1_Product_Shot_400pix.jpg)
![Mechanical Displays in LightWave 11 [dwb]](https://www.liberty3d.com/wp-content/uploads/2012/03/MechanicalDisplayProductShotSm.jpg)
![Advanced Space Scene Creation Vol. 2 [kat]](https://liberty3d.com/wp-content/uploads/2010/08/AdvancedSpaceSceneCreationVolumeTwo_Advert_R01.jpg)