


LW Target Camera Set Up
 I’m about to start working on a freelance project and wanted to have some of the functionality of Video Copilot’s Sure Target 2 After Effects plugin inside of LightWave. I’m not the 1st person to tackle this problem (see thread), but I went ahead and did my version of it before trying out the one raw-m (newtek forums) made. When I looked his scene, I found the tekniques were essentially the same in concept and similar in execution. I wasn’t trying to add in all of the functionality of the AE plugin, but this should suit my purposes.
I forgot to mention a few things in the video like that you can still animate the camera because it’s just parented to a null and how to actually set up the scene for yourself. See the instructions for that below.
Download the scene and .node files here: LW_Target_dwburman
There is a demo scene and two node set ups in the .zip file.
LW_target_11.6.nodes uses compound nodes and has controls for offsetting the camera position or rotation. Those controls didn’t quite work out the way I wanted them too, but I left them in so I could simply add some noise or extra motion in the camera move (kind of like the wiggle in the AE plugin)
I’m about to start working on a freelance project and wanted to have some of the functionality of Video Copilot’s Sure Target 2 After Effects plugin inside of LightWave. I’m not the 1st person to tackle this problem (see thread), but I went ahead and did my version of it before trying out the one raw-m (newtek forums) made. When I looked his scene, I found the tekniques were essentially the same in concept and similar in execution. I wasn’t trying to add in all of the functionality of the AE plugin, but this should suit my purposes.
I forgot to mention a few things in the video like that you can still animate the camera because it’s just parented to a null and how to actually set up the scene for yourself. See the instructions for that below.
Download the scene and .node files here: LW_Target_dwburman
There is a demo scene and two node set ups in the .zip file.
LW_target_11.6.nodes uses compound nodes and has controls for offsetting the camera position or rotation. Those controls didn’t quite work out the way I wanted them too, but I left them in so I could simply add some noise or extra motion in the camera move (kind of like the wiggle in the AE plugin)
The LW Target compound node: external
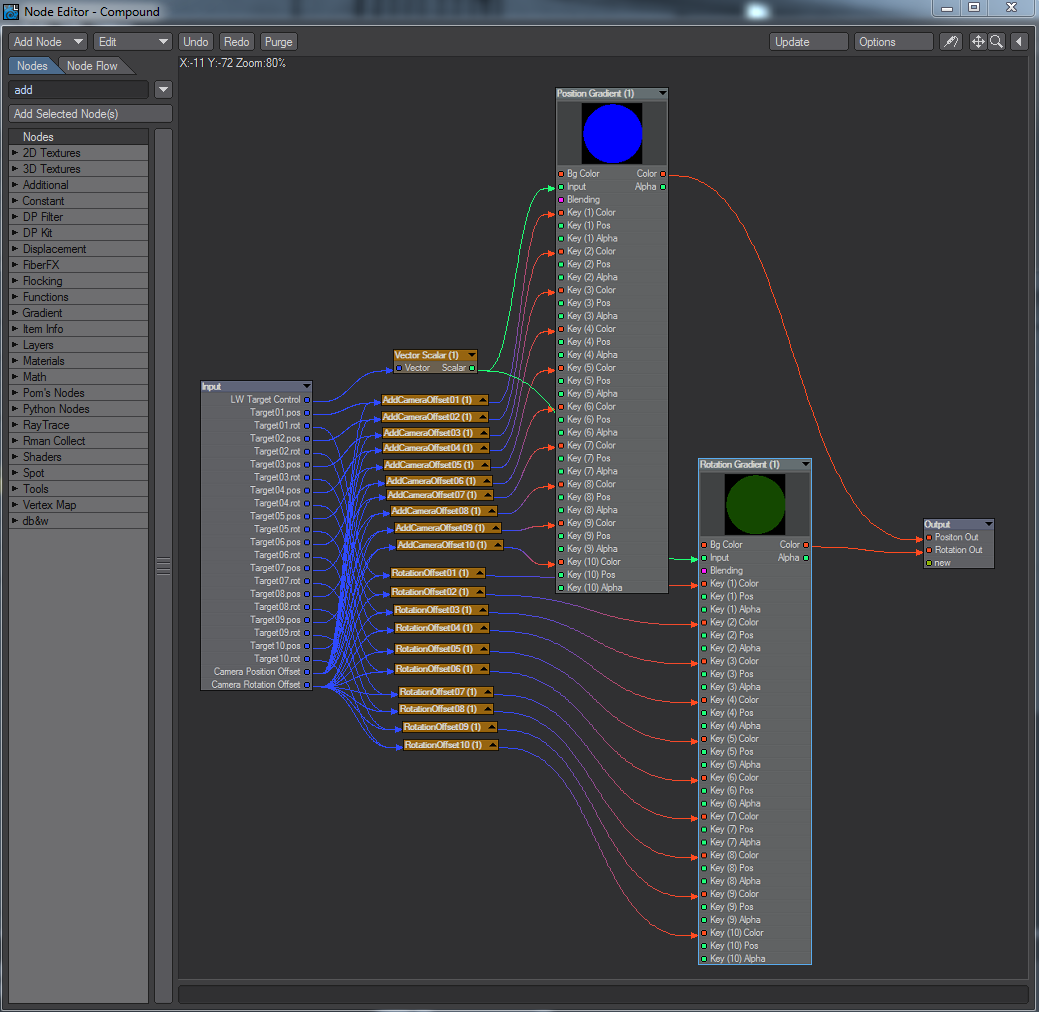
Inside the Compound Node
The Basic usage is:
In a scene that has the items you wish to look at:
LW_Target.nodes is a slightly older version without the offsets added in and without the compound node, so it will work with earlier versions of LightWave. This one will be easier to extend. You’ll probably want to switch the wiring so the target position comes from “World Position” instead of “Position”.
- Make 2 nulls to control the camera.
- One to control the position and one to parent the camera to. (alternately, you can use the “same as item” option in the motion panel for more control.
- Parent the camera to the second node.
- With the second node selected, press “m” to bring up the motion options panel.
- Click the “Add Modifier” pulldown menu and select “Nodal Motion”
- Double Click “Nodal Motion” to open the node editor.
- In the Node Editor, Click the “Edit” menu and select “Import Nodes” and select LW_target_11.6.nodes from the file menu.
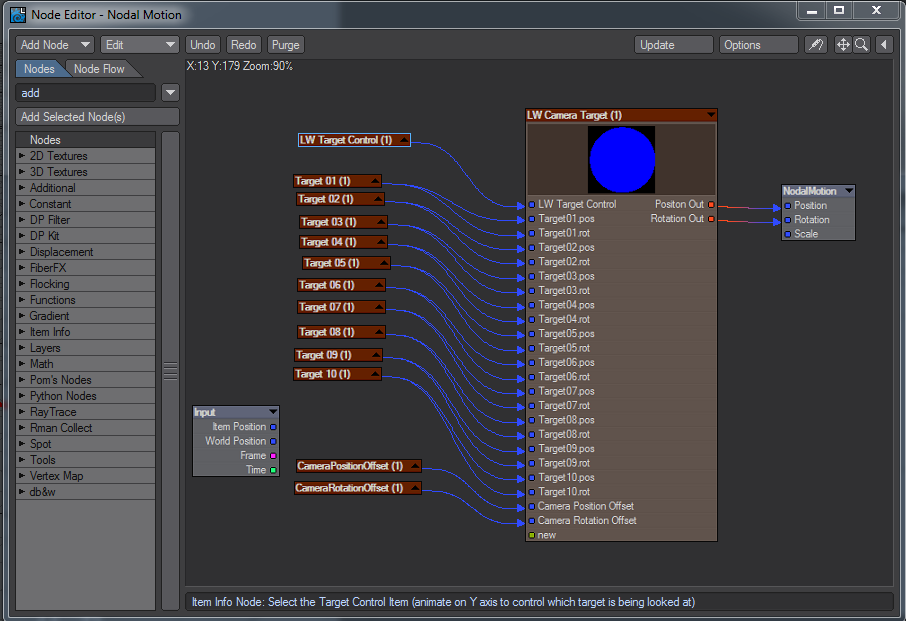
- Double Click LW Target Control and select the control null you made in step one.
- Double click each of the Target nodes (Target 01, Target 01, etc) and select the items you wish the camera to be pointed at
- Connect the Position Out of the LW Camera Target node into the Position dot on the NodalMotion node.
- Connect the Rotation Out of the LW Camera Target node into the Rotation dot on the NodalMotion node.
- Animate the 1st null in the Y axis to move through the camera positions (1 meter=position 1, 2 meter=position 2, etc)
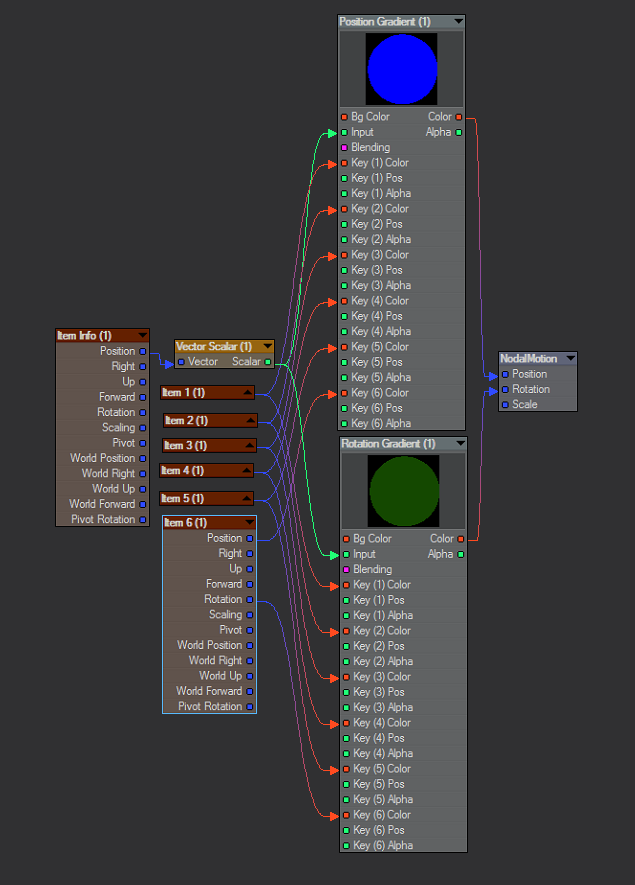
The “simpler” node setup that can be used in older versions of LW.
The Basic usage is:
In a scene that has the items you wish to look at:
- Make 2 nulls to control the camera.
- One to control the position and one to parent the camera to.
- Parent the camera to the second node.
- With the second node selected, press “m” to bring up the motion options panel.
- Click the “Add Modifier” pulldown menu and select “Nodal Motion”
- Double Click “Nodal Motion” to open the node editor.
- In the Node Editor, Click the “Edit” menu and select “Import Nodes” and selectLW_Target.nodes from the file menu.
- Double Click Item Info (1) and select the control null you made in step one.
- Double click each of the Item nodes (Item 1, Item 2, etc) and select the items you wish the camera to be pointed at. (This is the point where you may want to switch the outputs of the Item nodes from “Position” to “World Position” … at least if the item you want the camera to look at is parented to another.)
- Connect the Color output of the Position Gradient into the Position dot on the NodalMotion node.
- Connect the Color output of the Rotation Gradient into the Rotation don on the NodalMotion node.
- Animate the 1st null in the Y axis to move through the camera positions (1 meter=position 1, 2 meter=position 2, etc)
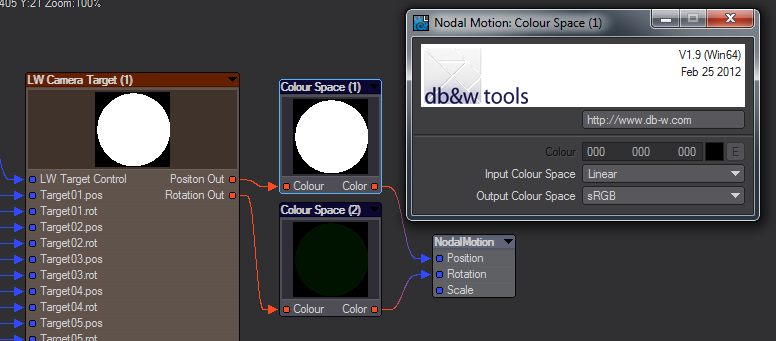
NOTE: If you try to set up a scene and the camera parent node (or whatever you’re applying the nodes to) is way off (like not anywhere near where it should be), it could very well be the color space issue I mentioned in the video. To fix this, set the color space to “disabled” in the options panel, or (better option) use dw&b tool’s Colour Space node between the output of the nodes and the inputs on the NodalMotion node. In my scene, I set the “Input Colour Space” to “Linear” and the “Output Colour Space” to “sRBG” to match my color space settings.
Good Luck, and have fun!
-dwburman « Memorial Weekend Begins our 4th Anniversary Celebration Sale! (Previous News)
(Next News) Sluggish site access. »
Related News

Get 30% off during our Annual Back to School Sale here at Liberty3D.com!
Back to school with Liberty3D.com has never been better! Save 30% on almost everything inRead More

Babylon 5 Legacy Collection For LightWave3D
In an attempt to preserve some of the legacy of LightWave3D’s history in the 3DRead More

LightWave3D Users Group Meeting!
Join us on Sunday, December 8th for the next LightWave3D meeting. Kat will be presentingRead More

It’s time for our 9th Annual Halloween sale!
We love Halloween without a doubt. This year we are getting our fright-night on withRead More