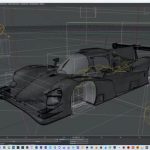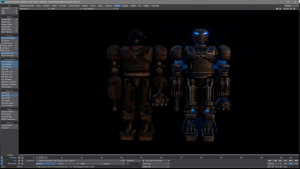
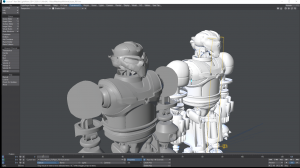
Original On Left. Rebuild On Right
a very green first time director wanted to make a swashbuckler action adventure film along the lines of “Raiders of the Lost Ark”, “Star Wars,” and “Sky Captain and the World of Tomorrow”. He rolled up his sleeves, and shot an epic on 85% green screen. His solution to everything was, “We’ll fix it in post.” Not only did this become his standard answer, it became his mantra. And then one day, the dreaded post-production process started. The director I am an talking about is me, and the film is Curse of the Phantom Shadow. Trying to make a Marvel Comic style film on their one day coffee budget meant cutting corners. As the old saying goes, “Cheap ultimately becomes expensive.” And that old saying
became incredibly true as I learned about all the repercussions of my short sighted “fix it in post” thinking. The biggest thing that bit me in the rear-end was hiring non-production ready artists. I used such services as Upwork, and Fiverr. I found artists in foreign countries, and tried to make my dollar go further. I soon learned that there is a reason why a custom model cost me in the hundreds of dollars as opposed to the thousands of dollars. These low budget artists, likely working with pirated software that I had hired in foreign countries: at best were hobbyists, and had never had any of their digital assets used
in an actual production.

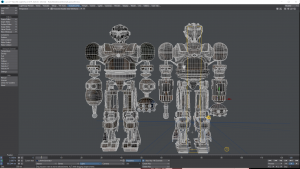
Original On Left. Rebuild On Right
In one extreme case, not only did I pay in the hundreds of dollars for my 3D model, it was not even an original work. The devious artist took a previous model, and re-sold it to me. And oh my, was it bad. It looked pretty, but once visual fx started, and the professionals took over, we learned that some of the geometry was not symmetrical where it should be.
Worse, parts of the geometry didn’t connect to other parts, and some of it was just hanging in thin air. Imagine now, trying to apply physics to that model for a simulation — it cannot be done. What would appear to render “ok” from some camera angles, failed to do so from other angles or looked awful in motion, presenting all sorts of render errors.
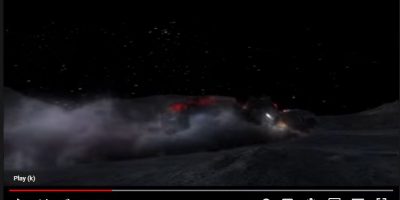
But the biggest insult to my injury was the robot model used for my film’s climax. I imagined this 8 story high mechanical monster wreaking havoc and terror on an entire city. It would be my mechanical Godzilla. It would be my homage to all of the classic science fiction, and monster movies shown on my favorite UHF channel when I was a kid.
Unfortunately, when I finally received my model, he was not ready for his closeup. In fact, he wasn’t ready for production at all.
My 3D model suffered a litany of problems:
- nGons — polygon with more than 3 or 4 points, which will not sub patch correctly.
- Flipped polygons — polygons in the mesh that are facing the wrong direction
- Non planar polygons — polygons which are twisted (typically an nGon)
- Missing UV maps
- Overlapping UV maps
- Non visible geometry — high poly count for non visible polygons
- Extremely low resolution texture maps
- Non symmetrical — object was not lined up on axis
- Triangles used where polygons should be quads — causes issues with sub patching. Triangles are best used for video games, not film production assets.
- General low quality of the original model mesh
- Excessive poly count on small details
- Insufficient poly count on large details
- Model was not render ready in any capacity — high poly count would have killed render times
- The model needed to be “re-modeled” while retaining a semblance of the original model’s design
- Mechanical elements in the design were not animation ready — rigging would have been next to impossible
- No consideration was made for the animator at all.
Original On Left. Rebuild On Right
This green filmmaker found that his 3D model needed a lot of work in order to become a camera ready asset. Liberty3D to the rescue. Kelly “Kat” Myers, an accomplished production artist reviewed the model, and brought my robot back to life. He documented the entire process of rescuing a substandard model, originally constructed in 3D Studio Max, and bringing it back to life in LightWave3D. Once again, LightWave3D comes to the aid of one of the so-called “big players” of the 3D tools market. “Practical Production Techniques Volume 15” contains over 7.6 gigs of video tutorials showing you the tricks, techniques, and secrets, of how this was done. If you have ever had to fix a bad asset, you’ll want to watch this title. As I doubt there is any production artist out there, who hasn’t encountered a problem similar to mine.
As a director, I had no idea that my “cheap” 3D model would create such a plethora of post production process headaches. I watched as Kelly rebuilt my robot bolt by bolt, while retaining the original vision of its design. My story not only serves as a cautionary tale, but inspired this new tutorial in order to demonstrate to others how to turn around a bad 3D model, and get it production ready. Of course, had I just hired a professional LightWave3D production artist to start with, I may have avoided such problems. No matter, nearly every production always encounters a 3D model that is substandard, and these substandard models can cripple resources on a production. This tutorial will prevent you from going down the rabbit hole, and make sure you see daylight at the end of the production.
Last but not least, I also got my hands dirty, and textured the robot.
As part of my duties as the film’s director, I have had to get some proficiency with these tools. I learned by watching tutorials from Liberty3D.
Original On Left. Rebuild On Right
Get this tutorial,
Practical Production Techniques Volume 15, now for just $49.95USD