


Independence Day Sale!
 Independence Day Sale from Liberty3d.com!
~Fourth of July Savings~
We have an fantastic sale starting today and runs until July 5th, 2014. Use the Coupon Code “Liberty4th” and get 25% off on your Liberty3d.com brand tools and training purchases including many of our new bundles! Check out our new products and bundles below!
Independence Day Sale from Liberty3d.com!
~Fourth of July Savings~
We have an fantastic sale starting today and runs until July 5th, 2014. Use the Coupon Code “Liberty4th” and get 25% off on your Liberty3d.com brand tools and training purchases including many of our new bundles! Check out our new products and bundles below!
Adam Gibson’s 3D Coat 4 Bundle Pack I – Volumes #1 to #12
Adam is at it again! He’s brought us another complete package of training for 3D-Coat 4.x bundled together for one low price. Version 4.x of 3D-Coat has been getting a lot of attention lately with the new features really packing a hard punch, yet many users have barely scratched the surface of their functionality. Adam’s bundles and training for 3D-Coat can get you up to speed fast.
Ryan’s Animation Kit:

Save 40% with this powerhouse product bundle by Ryan Roye. The package includes:
- The Comprehensive Guide to IKBooster, parts 1-2
- The Comprehensive Guide to IKBooster, parts 3-5
- Common Scenarios for Character Animators
- Delura Behind the Scenes
You will have everything you need to greatly enhance your animation workflow at a fraction of the price it would otherwise cost to purchase them separately. The savings you get from this bundle may be combined with coupon codes for additional savings! How is that for awesome? Got a client who needs you to animate their company mascot or wants a character demoing their product? Do you want to animate your own characters? This is the product bundle you absolutely should have on hand to make your life easier. The Comprehensive Guide to IKBooster is one of our top selling products in the last fall when parts 1-2 were initially released. There is a really good reason for that! It kicks ass! Get Parts 1-5, Common Scenarios for Character Animators and Delura: Behind the Scenes for this great price and be a master of digital puppets! Just ($129.95) And remember…. DON’T FORGET TO USE THE COUPON!
Kat’s Awesome TFD For LightWave3D Bundle!
You will love this deal! Just in time for the Fourth of July! Blow stuff up!

SketchFab is FUN! But only if you bake your textures out!
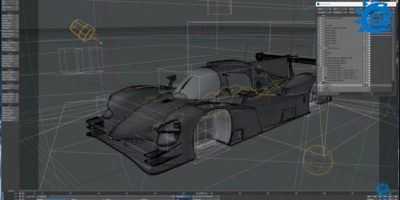
In our last newsletter we told you more about how The LightWave Group has produced an exporter for Sketchfab which you can use to send your models directly from layout to Sketchfab.com. But if you really want to make things look awesome you need to have UVs and bake out your surfaces before upload. The LightWave Group’s Cody Burke does a great job of explaining the exporter but if you want to learn how to make your objects look like they are fully rendered then you need Kat’s Advanced Surface Baking Tutorial! Check out Kat’s quick test bake via SketchFab here and continue reading while you play around. Works great on the MicroSoft Surface! Not so much on the ipad (sorry Apple). Here is the link!! ARK 14 Set Piece Bake Test by liberty3d on Sketchfab Grab the Exporter from here or click the player above.
Once you get your head wrapped around that part of the exporter, it’s time to make your stuff look awesome. Kat shows you how to take advantage of LightWave3D’s poweful render engine and the LightWave Surface Baking Camera along with your favorite compositing tools to produce photo-realistic surface baking of just about any object you can imagine and get them ready for use in a video game engine such as Unity3D or Unreal UDK and now the SketchFab.com site!
With a run time over 200 minutes, Practical Production Techniques Volume 6: Advanced Surface Baking takes you through the basics and fundamental concepts of surface baking and ramps up to high-end, never before revealed techniques Kat has used in production on console games and film/tv shows. This video is a must have for anyone looking to take advantage of LightWave and Unity3D together.
Get photo-realistic results using these methods while also optimizing your work flow to make it possible to push through entire sets or levels for your game production.
Using assets from the “Stasys” production, this is a real world example and not “theoretical” concepts. The results speak for themselves and you will be able to achieve the same results regardless of you just starting out or having extensive experience in 3D/Games production. Just $24.95USD (Use the coupon already ok?)
Once you get going with Baking in LightWave3D you need to get your stuff into Unity3D an animate them doing stuff!4 Unity3D Pipelines for Animations by Chilton Webb

Unity Pipelines for Animations will walk you through the 4 methods of animation in Unity, using terminology and concepts familiar to LightWave3D users. It covers the new BlendShapes in Unity 4.3 using Endomorphs in LightWave 11.6.3, as well as traditional bone rigged animations, Unity Animations, and entirely scripted animations.
It shows you how to build a working, responsive gun turret using each of the animations, which will spin and fire.
It also includes a more advanced version of the scripts you’ll see in the tutorials, including free models, scripts, and a working head start for a game that uses those scripts. So if you want to learn how to build animations in Unity3D using LightWave3D fast, this will show you how, give you examples, tips, and even a working start for your own game.
(You could easily incorporate this along with the Velocitractor from the other tutorial, and you’d be about 90% done with an entire game!)
Also included is a bonus addendum with tips and secrets to getting around a few known bugs (which will save you a ton of head scratching), what drawbacks exist for each type of animation, and generally how to make your animation life easier.
You can get a free demo of Unity Pro 4 here… Unity3D.com You can get a free demo of LightWave 11 here… LightWave3D.com
Contents include four videos that show various techniques to arrive at the same animation. Specifically, a gun barrel will spin around on its base, and fire. When it fires, the barrel will recoil, then slide back into position.
Unity Animation (15 minutes) – Use Unity’s built-in keyframe animation to assemble layered models right in Unity.
Scripted Animation (15 minutes) – Use C# to drive the same animation from scripts, accessing and interacting with hierarchically stacked layers.
Bone Rigged Animation (15 minutes) – Use Skelegons and Bones to create a rigged version of the animation, along with weight maps to allow a single layer object to behave as multiple layers. This is all driven by a simple script. This technique requires only 1 draw call in Unity, and is perfect for mobile games. It requires a bit more setup than the other methods, but works spectacularly.
Blendshape Animation (15 minutes) – Use Endomorphs in LightWave to generate a morph mapped file that can be easily manipulated by hand, or by script, on a single layer. This technique requires only 1 draw call in Unity, can be created straight from Modeler, and is perfect for mobile games.
Hard Body Animations Unity project. This includes the models seen in the videos, as well as a more advanced, working version of the models and scripts that show slightly more advanced concepts.
Addendum (bonus notes) covers when to use which animations, drawbacks to each type, and known bugs you should know about, so you can work around them.
All of this, for $19.95! (Remember to use the coupon code: Liberty4th and get 25% off!)
Order now, and in less than an hour you’ll know exactly how to animate hard body models quickly and easily!
Still Hot!!
Pixel Displays for Lightwave3D by D.W. Burman

In this tutorial for LightWave 3D, Dana W. Burman shows how to build and animate “pixel displays” using Denis Pontonnier’s DP_Filter and DP_Kit plugins.
He starts with explaining concepts relevant to these projects, shows how to set up the surface of instanced blocks using DP_Filter’s Replace Spot to color their surface, and follows it up with expanding on the technique to specific use scenarios including LCD pixel with separate red green and blue channels, LED displays, to using the technique on parts (connected polygons) and instances attached to moving particles, and he shows how this technique can be used in projects other than “displays”. He ends with an overview on setting up each display so it can be moved around in your scene as well as a few different ways to parent objects in Layout.
The tutorial includes scene and object files (including render and illustration scenes) that you can refer to or use as a starting point. There are untextured versions of the LCD, LED, and block textures. The surface nodes on the textured objects have been annotated to explain what each node is doing.
Also included are *.node files that you can import into your surface. This tutorial makes heavy use of instancing and therefore would be best used with LW 11 and up. All this for just…
Price: $19.00USD (Got the message yet about using the coupon?)Check out all of Dana’s videos here!
Related News

Independence Day 2026! 50% off until July 9th!
To help celebrate the 250th Anniversary Declaration of Independence of the United States of America,Read More
Massive LightWave3D 2026 Presentation!
For those of you who missed it, all 5 hours and 55 minutes of awesomeness,Read More

Happy Easter! Get 35% off until April 16th!
Ah yes! It’s time again for our annual Easter Sale. Get 35% off almost everythingRead More
LightWave3D 2026 Technology Demo!
Yeah it’s 2 hours and almost 40 minutes long, but all the amazing stuff youRead More